How do I install WordPress?
WordPress is a CMS (Content Management System). It's a turnkey solution for creating a website without learning to code.
Available free of charge, WordPress enjoys great popularity thanks to its ease of installation and use. Its success is also due to its rich and diversified ecosystem, which attracts a great deal of interest from the developer community. Developers regularly release themes and add-ons to enhance the CMS' functionality.
Since it first appeared in the mid-2000s, WordPress has constantly evolved to keep pace with new trends and the different types of devices used to browse the web.
In this article, we'll take you step-by-step through installing and configuring WordPress, so you can put your blog or website online.
First step: buying a domain name
To begin with, you need to acquire a domain name. This should reflect the content of your site and, ideally, be easy to remember and enter. Once you've made your choice, go to a web host. In this article, we'll use the French hosting company OVH as an example, but there are many others, such as IONOS, Gandi and Ikoula.
💡 It's best to avoid hosting with WordPress.com, which takes care of some of the work for you, but limits many choices later on. To ensure the evolution of your site, it's best to opt for your own hosting solution.
On the hosting provider's website, you should first check that the domain name you've chosen isn't already reserved. If this is the case, it's best to look for another domain name idea.
Once you've confirmed the availability of the domain name, you need to reserve it and associate hosting with it. This can be compared to buying a plot of land on which to build a house: the domain name corresponds to the virgin land, and the hosting to the building permit.
Once you've made your payment, you'll receive several e-mails containing important information, including your login details. Keep them in a safe place, as you'll need them quickly.
On average, a domain name costs between €10 and €20 per year, and web hosting for a blog or small website costs between €24 and €72 per year. To find out more about the cost of creating a website, take a look at this JDG article.
💡 HTTPS: to obtain the "s" in the https of your domain name, which indicates that exchanges with your site are secure, you'll need an SSL certificate. The SSL certificate is included in the hosting package of the above-mentioned providers, starting with the most basic package.
Second step: installing Wordpress
Once you've purchased your domain name and hosting, you have two options for installing WordPress.
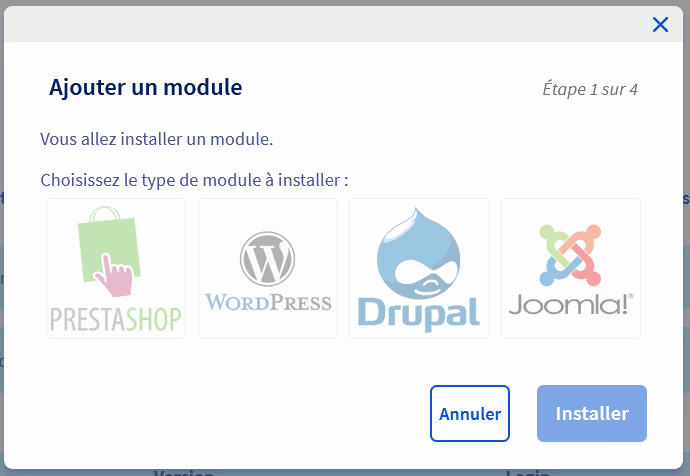
Solution 1: Install WordPress from the OVH manager
Go to: https: //www.ovh.com/manager/#/web/hosting/**monnomdedomaine.fr**/module
(In the URL, replace mydomainname.com with your domain name)
Then click on "Add a module", select WordPress, then click on "Install".
Solution 2: Install WordPress manually
If you're comfortable with the technical side of things, go to the French WordPress website to get the latest version: https: //fr.wordpress.org/download/#download-install
Once you've downloaded WordPress, unzip the files and transfer them to a "www" directory at the root of your site. To do this, you'll need the codes provided by OVH and FTP software such as FilleZilla (free).
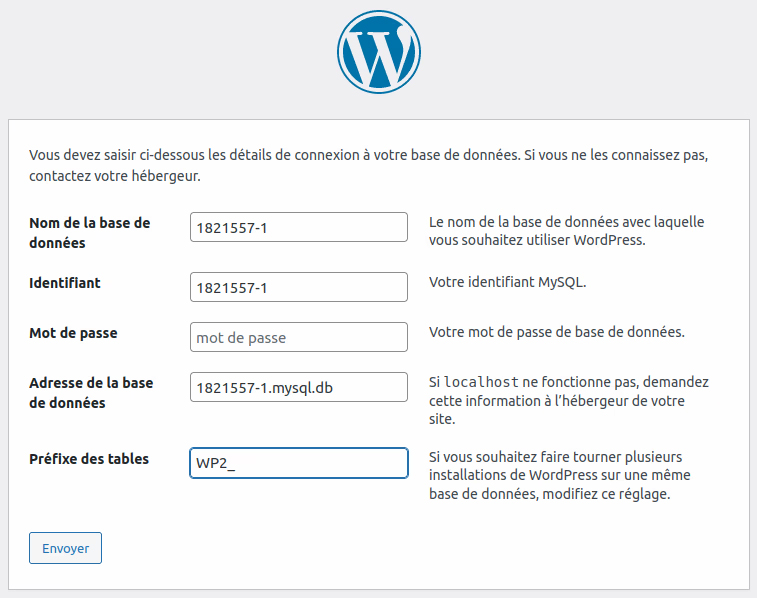
Step 3: Initial WordPress configuration
Now that the files have been uploaded to your hosting space, it's time to build the structure of your site.
Fortunately, the WordPress CMS offers a step-by-step guided installation process. This tool can be found at: www.monnomdedomaine.fr/wp-admin/setup-config.php
(Don't forget to replace mydomainname.fr with your domain name)
Once on this page, follow the step-by-step guide. In the second step, you'll need the codes included in the e-mails you received when you purchased your domain name and hosting.
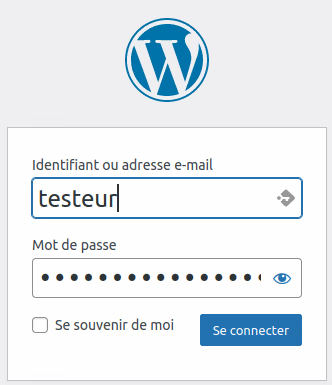
Once you've done this, you'll need to choose your site name and login details. Be sure NOT to check the "search engine visibility" box.

Then click on "Install WordPress" to complete the initial configuration. Congratulations, you now have access to the login screen for your WordPress site administration interface.
As site administrator, you have access to all site settings. So be careful not to change settings without understanding the consequences.
Here are the steps you need to follow before creating your first article. To continue the house metaphor, you need to :
- Draw a map ⇒ Create categories to organize your site's publications.
- Put up the walls ⇒ Create pages that group your categories together.
- Finishing touches ⇒ Make any necessary adjustments, such as audience measurement, link structure, etc.
- Decorate ⇒ Choose a theme and personalize it according to your preferences.
Step 4: Create the overall structure of your WordPress site
Create categories
The structure of your site is crucial, as it reflects the main themes you're going to cover. You therefore need to determine the content categories you wish to develop in your articles.
💡 For example, on a gardening blog, we could imagine categories such as "Organic garden", "Vegetable garden", "Indoor plants", "Tips and tricks", "Diseases and pests"...
Once you've determined your website's main themes, create your categories by going to the Categories section of the Articles menu.
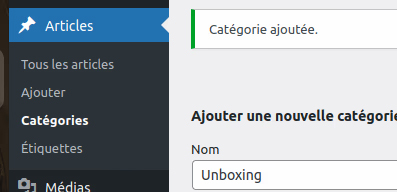
On this page, you can create Categories, which will also determine the tree structure of your site. Here are a few examples:
- The "Tests" category with the "test" slug will create URLs of type www.monsiteweb.com/test/
- The "News" category with the "news" slug will create URLs of type www.monsiteweb.com/news/
These parameters not only categorize your publications, but also help search engines to better index your site. So choose them carefully.
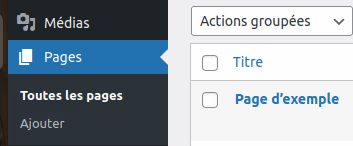
Create Pages
From the Pages menu, you can create the various pages that will appear in your site's menu. Websites generally have :
- Manual pages whose content will only evolve if you modify them, such as Contact or About pages.
- Category" pages that automatically display the latest articles published in a category (for example, the Affilizz blog page, which includes all articles in the "Affiliation techniques" category).
- You can also create pages to group your publications according to your choice.
To create a page, go to the appropriate menu:
To begin with, create a page for each of the previously defined categories, and an About page for your site's legal information.
To create a category page :
- Give the page a name: Tests, for example, if this is the page that will group your test articles.
- Below the title, click on the + sign and add a Latest articles block.
- Finally, in the bottom right-hand corner, type the name of the category you are interested in:
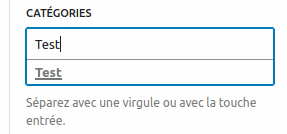
- Congratulations, your site now includes a "Tests" page, which brings together all the latest tests published on your site. Repeat these steps for each category you wish to create.
- Finally, click on Publish in the top right-hand corner to publish the page.
Step 5: Miscellaneous WordPress settings
Your site configuration is progressing step by step, and now it's time to take care of the minor adjustments.
General parameters
In Settings > General, you need to enter basic information about your site, such as its name and currency. This information will appear in search engines when you search for your site by name.
Other settings concern the geographical zone and date display. These are automatically set to the zone you are in during installation.
Category page configuration
From Settings > Reading, you can define the number of articles to be displayed on each page. We also recommend that you activate the "Extract" option, so that your articles are not displayed in their entirety on category pages.
Permalink configuration
The permalinks or "slugs" mentioned above indicate the URL of your content. By default, WordPress adds the publication date to the URL. To improve your SEO, go to Settings > Permalinks. In this menu, you'll see a default display; choose the "Publication title" option and save.
Many other settings are available for each WordPress feature. The interface is well designed, and you'll quickly get the hang of it.
Step 6: Choose the look and feel of your WordPress site
Your choice of theme will determine the visual appearance of your site. If you decide to change theme, the content (articles, photos, categories) you've created will be preserved, but you'll probably have to adjust the overall appearance slightly.
To choose a theme, go to the "Appearance" section of the left-hand menu.

From this menu, you can select a theme, preview it live, install it, uninstall it or customize it.
Clicking on "Customize" takes you to the theme configuration menu. From here, you can adjust the site structure: header, footer, columns. These modifications apply to all pages on the site.
For example, if you add an "Archives" block to a column on an article page, this block will be displayed on all your articles. The customization menu offers great freedom. We recommend that you familiarize yourself with the tool before saving your changes, and that you use a backup extension.
💡 The themes offered natively by WordPress are versatile and responsive: they adapt equally well to computer screens, smartphones and tablets. You'll also find many other themes, both free and paid, on various sites such as the official WordPress site or ThemeForest.
Step 7: Install WordPress extensions
WordPress is a CMS favored by many users, as extensions (both free and paid) can be used to add numerous functionalities. It's impossible to list them all here, but here's a selection of essential free extensions to add to WordPress:
- For backups: UpDraftPlus lets you create backups of your site. This is an essential thing to do before installing, for example, an update to your theme or WordPress itself.
- For security:
- Login LockDown secures your site's login page, blocking malicious login attempts.
-Akismet AntiSpam blocks unwanted comments and spam on your contact form.
For audience measurement: Analyticator lets you add Google audience measurement.
💡 To ensure that your site appears in the search engines, remember to open accounts and index it properly via Google Search Console and Bing Webmaster Tools. However, note that it can take several months for your site to come up, especially on competitive queries. See our article on How to structure an article for affiliate marketing to find out more about SEO.
Many extensions exist, and for your security, we recommend that you use the official WordPress website to install them: https: //fr.wordpress.org/plugins/
Step 8: Publish your first article
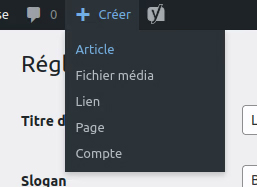
Once you've made all these settings, you're finally ready to create your first article. From any page of the interface, simply click on the Create > Article button at the top of the page:
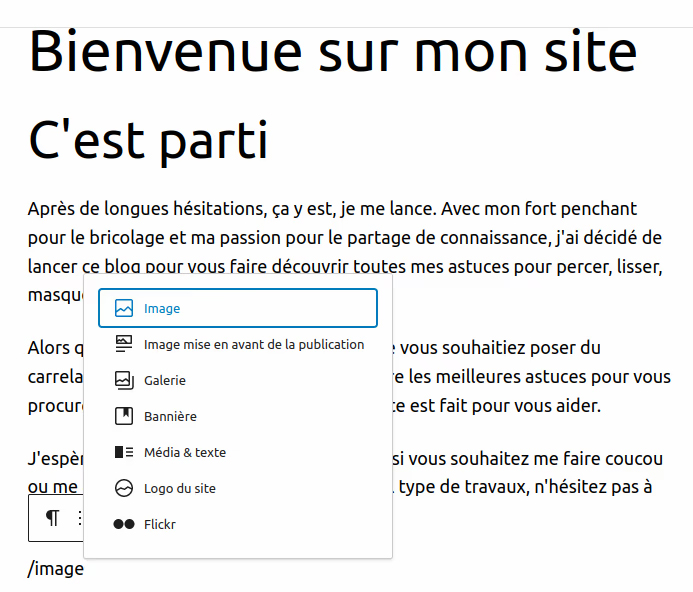
The editing interface uses a system of blocks: text block, image block, etc. After entering the title of your article, you must choose the type of element to add for each content item. For example, to insert an image, type "/image".
Once you have written your article, go to the right-hand column to make any final adjustments:
- Start by selecting the category corresponding to your item.
- The featuredimage plays several roles:
- It will be the image visible at the top of your article, on the category page, and, for example, on social networks if you share the URL of your article
- It accompanies the article and must be of high quality: nobody wants to read an article with a blurry or ugly image.
- It contributes to the referencing of your article in search engines. It contributes in part to the referencing of your article in search engines.
It is therefore essential to include a featured image, and recommended to include at least 2 images in your articles to improve their referencing and lighten the text. - Theexcerpt is important for the search engine optimization of your articles. In the results pages, it's the text that appears under the title of your article. It must therefore be well thought-out to encourage visitors to click on your link!
Finally, click on the Publish button at the top right of the page to put your article online. Congratulations, you've just published your first article on your site - the first of many!

Key points to remember
In this article, we've outlined the main steps involved in getting started with WordPress. This CMS offers a multitude of settings, and its extensions enrich its functionalities even further. It's up to you to experiment and get the most out of your publications. If you're feeling overwhelmed, you should know that many users have already taken this path; you'll find answers to your questions on the various community forums or by consulting the many WordPress advice blogs.


